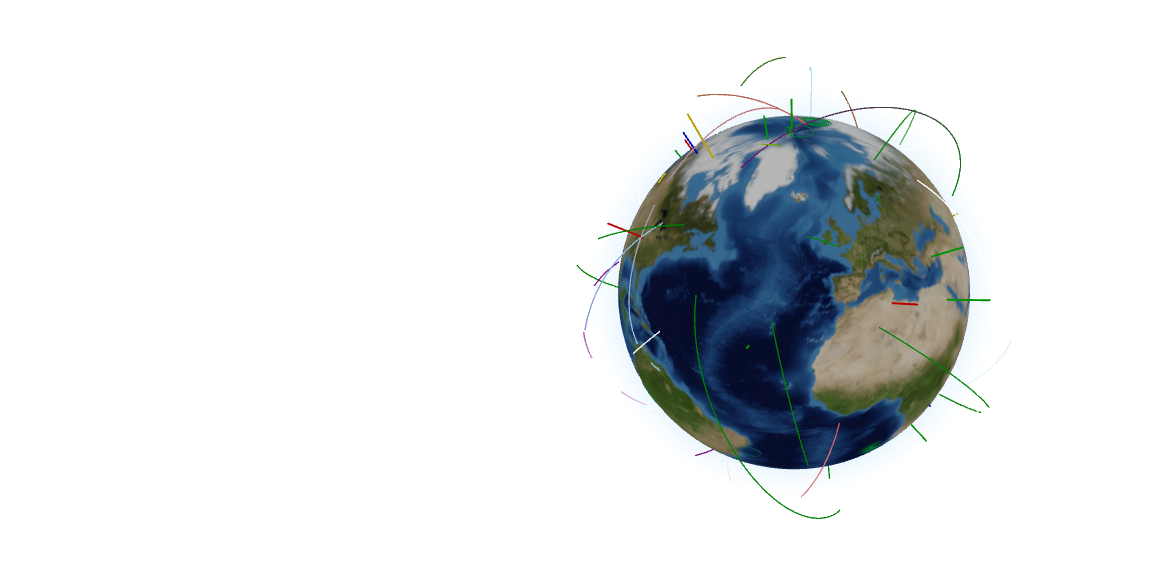
Visualize data on a 3D globe.

In this tutorial you will learn how to create a highly customizable 3D globe and how to visualize location data on to the globe.
Tags: Vue 3, Typescript, Three.js, WebGL, three-globe,
Time to read: 10 min
Prerequisites
- Familiarity with the command line
- Install Node.js version 16.0 or higher
Setup project
We will focus on building the globe functionality, so to save us some time we will begin from a scaffold. Lets setup the project from the scaffold.
Run below commands in the command line.
mkdir globe-app && cd globe-app
npx degit crunchwrap89/Vue3-TS-Scaffold
npm i three @types/three three-globe
npm run dev
Now if everything has been done correctly you can visit http://127.0.0.1:5000/ and you should be faced with a message saying ⭐ Success ⭐
Too much time indoors, in front of the computer? Find an activity to do Outside at GeoQuestr.com
Add components
To make this application a bit easier to understand i have split alot of the logic into smaller files and separated the code. First of all we will be adding the main component file.
Create a new file: src/components/GlobeScene.vue
add the below code to the file:
<script setup lang="ts">
import { useThree } from "@/composables/useThree";
import { useGlobe } from "@/composables/useGlobe";
import { useOrbitControls } from "@/composables/useOrbitControls";
import { onMounted } from "vue";

const { initThree } = useThree();
const { initGlobe } = useGlobe();
const { initOrbitControls } = useOrbitControls();

const { scene, camera, renderer } = await initThree();

const controls = await initOrbitControls(camera, renderer);

const { theGlobe, rotateGlobe } = await initGlobe();


scene.add(theGlobe);

function renderLoop() {
  rotateGlobe(theGlobe);
  renderer.render(scene, camera)
  controls.update();
  requestAnimationFrame(renderLoop);
}

function onWindowResize() {
  if (camera && renderer) {
    const renderTargetWidth = window.innerWidth;
    const renderTargetHeight = window.innerHeight;
    camera.aspect = renderTargetWidth / renderTargetHeight;
    camera.updateProjectionMatrix();
    renderer.setSize(renderTargetWidth, renderTargetHeight);
  }
}

onMounted(() => {
  const mount = document.getElementById("scene-mount")!;
  mount.appendChild(renderer.domElement);
  window.addEventListener("resize", onWindowResize);
  requestAnimationFrame(renderLoop);
});
</script>
<template>
  <div id="scene-mount" style="width: 100%; height: 100%;"></div>
</template>
Add composables
Now that we have our main component we will also add our composables, which mainly consists of logic that we have placed in separate files to make this main component easier to read.
Create a new file: src/composables/useGlobe.ts
add the below code to the file:
import ThreeGlobe from 'three-globe';

import { rndmPointsData } from '@/utils/randomize';
import { rndmRingsData } from '@/utils/randomize';
import { rndmArcsData } from '@/utils/randomize';

type TheGlobeEngine = {
  theGlobe: ThreeGlobe;
  rotateGlobe(theGlobe: ThreeGlobe): void;
};

export function useGlobe(): {
  initGlobe(dataset?: any): Promise<TheGlobeEngine>;
} {
  async function initGlobe(dataset?: any) {
    return new Promise<TheGlobeEngine>((resolve) => {
      const pointsData = rndmPointsData(25, 'red', 'blue', 'green', 'orange');
      const ringsData = rndmRingsData(25);
      const arcsData = rndmArcsData(25);
      const colorInterpolator = (t: any) => `rgba(0,255,50,${1 - t})`;

      const theGlobe = new ThreeGlobe()
        .globeImageUrl('//unpkg.com/three-globe/example/img/earth-blue-marble.jpg')
        .bumpImageUrl('//unpkg.com/three-globe/example/img/earth-topology.png')
        .pointsData(pointsData)
        .pointAltitude('size')
        .pointColor('color')
        .ringsData(ringsData)
        .ringColor(() => colorInterpolator)
        .ringPropagationSpeed('propagationSpeed')
        .ringRepeatPeriod('repeatPeriod')
        .ringMaxRadius(5)
        .arcsData(arcsData)
        .arcColor('color')
        .arcDashLength(() => Math.random())
        .arcDashGap(() => Math.random())
        .arcDashAnimateTime(() => Math.random() * 4000 + 500);

      theGlobe.scale.set(0.001, 0.001, 0.001);
      theGlobe.position.set(0, 0.05, 0);

      resolve({ theGlobe, rotateGlobe });
    });
  }

  function rotateGlobe(theGlobe: ThreeGlobe) {
    theGlobe!.rotation.y += 0.001;
  }

  return {
    initGlobe,
  };
}
Create another file: src/composables/useOrbitControls.ts
add the following code to the file:
import { OrbitControls } from 'three/examples/jsm/controls/OrbitControls';
import type { PerspectiveCamera, WebGLRenderer } from 'three';

export function useOrbitControls(): {
  initOrbitControls(camera: PerspectiveCamera, renderer: WebGLRenderer): Promise<OrbitControls>;
} {
  let controls: OrbitControls;
  async function initOrbitControls(camera: PerspectiveCamera, renderer: WebGLRenderer) {
    return new Promise<OrbitControls>((resolve) => {
      controls = new OrbitControls(camera, renderer.domElement);
      controls.maxPolarAngle = Math.PI * 0.9;
      controls.minDistance = 0.25;
      controls.maxDistance = 0.5;
      resolve(controls);
    });
  }
  return {
    initOrbitControls,
  };
}
finally, create file: src/composables/useThree.ts
and add the following code to the file:
import { PerspectiveCamera, Scene, WebGLRenderer, Color, AmbientLight, ReinhardToneMapping, FogExp2 } from 'three';

type ThreeEngine = {
  scene: Scene;
  camera: PerspectiveCamera;
  renderer: WebGLRenderer;
};

export function useThree(): {
  initThree(): Promise<ThreeEngine>;
} {
  async function initThree() {
    return new Promise<ThreeEngine>((resolve) => {
      const scene = new Scene();
      scene.background = new Color('white');
      scene.fog = new FogExp2(0xefd1b5, 0.3025);
      const camera = new PerspectiveCamera(75, window.innerWidth / window.innerHeight, 0.1, 1000);
      camera.position.set(0.1, 0.02, 0.38);
      camera.lookAt(0, 0, 0);

      scene.add(new AmbientLight(0x404040));

      const renderer = new WebGLRenderer({ antialias: true });
      renderer.setSize(window.innerWidth, window.innerHeight);
      renderer.toneMapping = ReinhardToneMapping;

      resolve({ scene, camera, renderer });
    });
  }

  return {
    initThree,
  };
}
Now we have all composables in place. Lets proceed.
Add utilites
Before trying to load the scene we must add the last file which has not yet been added. We will use this code to randomise data on to the globe, so that we will have some cool effects showing.
create a new file: src/utils/randomize.ts
add the following code to the file:
/**
 * Randomizes geoJSON for pointsData on theGlobe.
 *
 * @param N number
 * @param C1 string
 * @param C2 string
 * @param C3 string
 * @param C4 string
 */
export function rndmPointsData(N: number, C1: string, C2: string, C3: string, C4: string) {
  return [...Array(N).keys()].map(() => ({
    lat: (Math.random() - 0.5) * 180,
    lng: (Math.random() - 0.5) * 360,
    size: Math.random() / 4,
    color: [C1, C2, C3, C4][Math.round(Math.random() * 3)],
  }));
}

/**
 * Randomizes geoJSON for ringsData on theGlobe.
 *
 * @param N number
 */
export function rndmRingsData(N: number) {
  return [...Array(N).keys()].map(() => ({
    lat: (Math.random() - 0.5) * 180,
    lng: (Math.random() - 0.5) * 360,
    maxR: Math.random() * 20 + 3,
    propagationSpeed: (Math.random() - 0.5) * 20 + 1,
    repeatPeriod: Math.random() * 2000 + 200,
  }));
}
/**
 * Randomizes geoJSON for arcsData on theGlobe.
 *
 * @param N number
 */
export function rndmArcsData(N: number) {
  return [...Array(N).keys()].map(() => ({
    startLat: (Math.random() - 0.5) * 180,
    startLng: (Math.random() - 0.5) * 360,
    endLat: (Math.random() - 0.5) * 180,
    endLng: (Math.random() - 0.5) * 360,
    color: [
      ['gold', 'white', 'skyblue', 'green'][Math.round(Math.random() * 3)],
      ['indianred', 'white', 'purple', 'green'][Math.round(Math.random() * 3)],
    ],
  }));
}
Load Scene
Now we have all the files we need, we must only change some of the boilerplate code that we have in the App.vue.
replace the App.vue file with the below code:
<script setup lang="ts">
import GlobeScene from "@/components/GlobeScene.vue"
</script>
<template>
  <Suspense>
    <template #default>
      <GlobeScene />
    </template>
    <template #fallback>
      loading..
    </template>
  </Suspense>
</template>

<style>
@import "@/assets/base.css";
</style>
Finalize and run app
Now run npm run dev and enjoy your 3D globe! You can find some commented code in the useGlobe file that you can play around with to get different looks to the globe aswell as show other type of data. For more info about three.globe you can: check out this link
Did you like this tutorial?
You can support me, so that i can continue to make more tutorials like this one.


